

Index Of The Blog
Google Analytics Guide
The web analytics tool “Google Analytics” gives you the ability to track and analyze traffic and user traffic on your site, and to optimize your website, content and marketing efforts based on it. All you have to do to get the data is to create a Google Analytics account and install the tracking code on your website. We will show you step by step how to do it. You’ll also learn how to integrate Google Analytics with Google Tag Manager.
Create a Google Analytics account

First of all, you have to create a Google Analytics account. For that, you need a Google Account. If you already have one, you can easily log in to the Google Analytics homepage with your email address and password.
If you do not have an account yet, click on “Start Free” and set up your Google Account. You can also use it for Gmail, Google AdWords or Google+.
If you already have a Google Account, click on “Login” and you will get to the setup page of Google Analytics.


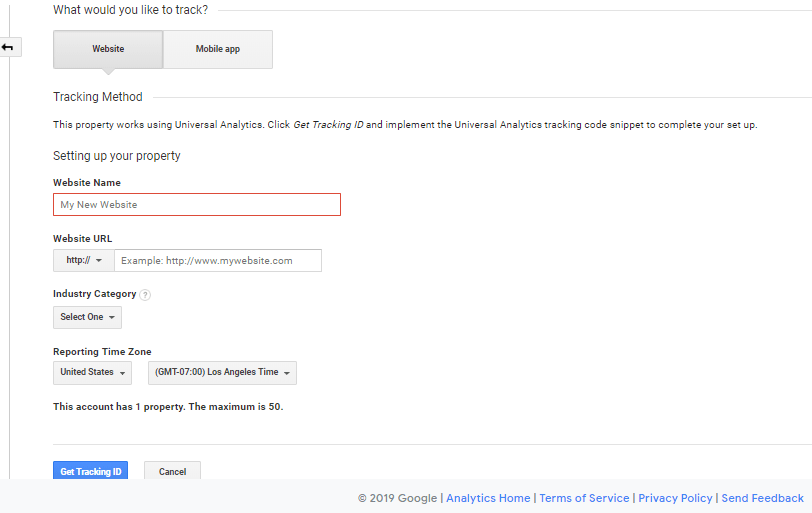
Here then simply click on “Register”. This will open a form. Here you can choose whether you want to create the account for a website or a mobile app. For example, we select the option Website here.
Just enter the name for your account, the name and the URL of your website. After that, you select an industry that fits your website, your country, and the correct time zone.
Next, you can choose to share your data with other Google services, Google employees, or general statistics. By default, all points are enabled. But your Analytics reports will work if you do not pick them. However, you should tick at least the first point if you want to use Analytics data, for example, in Google Ads.
If everything is filled out, click on “Get Tracking ID”.
Then you select your country and confirm the applicable terms of use of Google Analytics if you agree with them. In addition, if you have previously indicated that you would like to share your data with other Google services, you must also accept privacy policies for those who are responsible for the metering and data management.
After you have confirmed the terms of use, you will receive the Google Analytics tracking code. This refers to the property that you have just created and not to the entire account. For data to enter your account, you must now install it on your website.
Include Google Analytics tracking code
You can either store the tracking code directly in the source code of your website or integrate it via the Google Tag Manager. But it is important that you install the code only once on each page. If you implement it both in the source code and via the Tag Manager, the data will double in your account.
Include tracking code in the source code
In order for your website’s data to fully enter your Google Analytics account, you’ll need to embed the tracking code on every subpage of your website. The tracking code is the same for all pages, you do not need to make changes for each page. It is a JavaScript file.
You can find the tracking code in your Google Analytics account under Administration> Property> Tracking Information> Tracking Code
You copy the given code into the source code on every subpage of your website from which you would like to receive data, ie preferably all.
Ideally, place the tracking code in the header area of your website right after the opening elements of the site. Do not worry, as the JavaScript file is loaded asynchronously, it does not affect the load times of the website or only to a very small extent.
Tip: If you use a Content Management System (CMS) such as WordPress or Typo3, there is usually a template that specifies the structure and design of the website. This consists of several individual components, including a header, which is played on each subpage of the website. This area is ideal for the tracking code.
Anonymize IP address
To use Google Analytics for privacy, you must now make absolutely sure that the IP address of your users is not included. To do this you add the following information to the tracking code:
gtag (, config ‘,, UA-xxxxxxxx-x’, {, anonymize_ip ‘: true});
The code should then look like this:
You still have to replace the entry UA-xxxxxxxx-x with the tracking ID of your Analytics property. You can find these here:
If you do not ensure that the IP address is anonymized, it may happen that your data is deleted without warning from Google.
Include tracking code with the Google Tag Manager
Alternatively, the tracking code can also be integrated via the Google Tag Manager. The advantage of this is that only once a Google Tag Manager code must be stored in the source code of the website. All changes to the tracking can then be made via the user interface of the Tag Manager. If the tracking code is firmly embedded in the HTML code, however, it must be adjusted manually on each page every time you want to change something. Learn more about the benefits of the Tag Manager in the article “Google Tag Manager: Benefits and Applications”.
To use the Tag Manager, you must have a Google Tag Manager account. Once you have done that, you create a new container for your website and give the name or URL of your website as the container name. In fact, you are completely free in the choice of name.
Then you can choose to use the container on a website, in an app or on AMP pages. Here you choose web. Next, you’ll receive the Google Tag Manager code that you need to copy into the source code of your website.
You name this with Google Analytics or Universal Analytics, whichever you prefer. But it’s best to choose a name that also tells other potential users what’s behind the tag.
When configuring the tag, you can choose between Universal Analytics and Classic Analytics as the tag type.
Take Universal Analytics. The classic Analytics is outdated. When we set up tracking a website, we only use Universal Analytics.
For tracking type, you choose “pageview”.
Then tick “Enable override settings in this tag” and enter the tracking ID from your Analytics account here:
In order to comply with the German data protection guidelines, you must also anonymize the IP addresses via the Tag Manager. To do this, create a “field to be defined” under “Additional Settings”. As the field name, you select “anonymizeIp”, as the value you give “true”.
Alternatively, you can specify the tracking ID and anonymizeIp via a variable. Then you can not make any more analytics adjustments in the tag itself.
Next, you select the trigger. This indicates under which conditions the day is played out. Take “All Pages” here.
Then you save the day off.
This creates the tag for the analytics code. It is not yet played on the website. For this, you have to publish the container yet. Go to the top right in the menu on “SEND”. Here you can now create and publish the first version of your Tag Manager container. Give the version a name and enter a description of what you have created. This will help you later to understand your work steps.
Are the data correct?
After you have integrated the tracking code – whether directly in the source code of the website or via the Google Tag Manager – you can check in the Google Analytics account, if the data arrive correctly. Go to a page of your website. The Analytics account under Administration -> Property -> Tracking Information -> Tracking Code should now show that the tracking code is active.
What data is actually being tracked on your website can be tracked in the reports under Real Time.
Privacy policy and opt-out In addition to the anonymization of IP addresses, German data protection provides further conditions for the data to be collected by Google Analytics.
Adjust privacy policy
You must inform your users that you are collecting their data. Create your own page on your website with the title Privacy or insert a text in the imprint. It is important that the privacy policy is accessible from any sub-page of your website.
In addition, you must allow your users to prevent the collection of data, so turn off the tracking. This is called the opt-out. Here you can read how to install a corresponding script in your website.
The contract for data processing
Another requirement for using Google Analytics in compliance with data protection is the conclusion of a contract data processing contract. While you had to complete this in written form before the entry into force of the GDPR, you can easily do this in digital form using the Analysis Tool itself. Just go to the Analytics account in the administration in the account settings.
Here’s another chance to change the data sharing you set when you created the account. Below is the addendum to data processing. As long as you have not given your consent, this will be displayed accordingly.
Then you click Save. Only then is the change executed. The date of approval will be recorded and will appear from now on.
Then click on the link “Manage data processing details”. Here you enter your company name and the contact person who is responsible for your data processing. This can be for example the managing director or also an own data protection officer. The person must be available for contractually required communications and ensure compliance with the GDPR.
More about privacy and Google Analytics can be found in the blog article “Privacy Policy for the use of Google Analytics”. At this point, I would like to point out that luna park as Digital Marketing Agency can not or can not provide qualified legal advice.
Conclusion:
After you’ve deposited the tracking code on your website, the first data will go into your Google Analytics account. However, these are primarily only unfiltered page views. To get reliable data, you’ll need to structure and set up your account accordingly, for example with spam filters, IP filters or linking to other Google services like the Google Search Console or linking to your Google AdWords account.
Search Console Guide